Explanation
|
Video and Pics
|
Overview
|
|
|
|
Settings
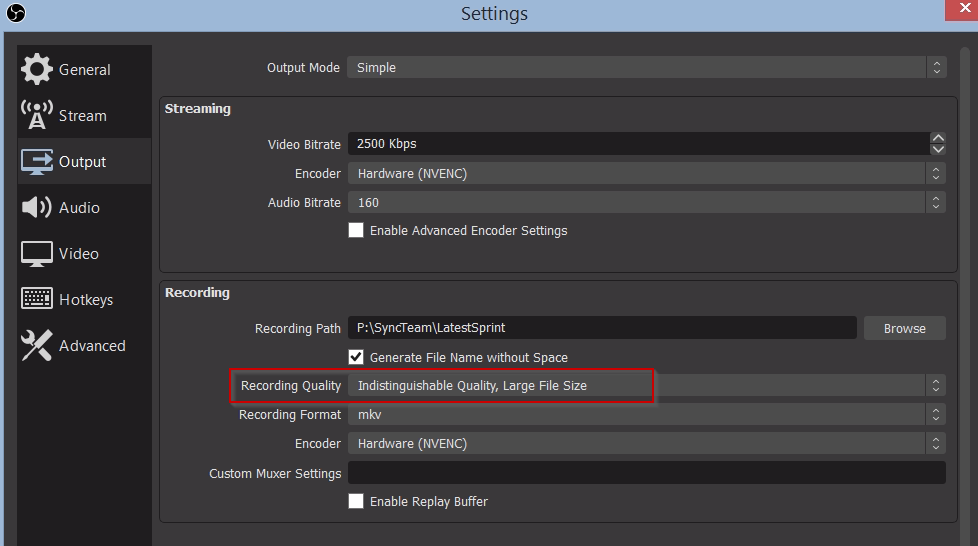
Output –> Recording
In order to allow for the pause button, we need at least
“Indistinguishable Quality, Large File Size”
|
|
Output Settings
- [x] Output Settings
- [x] Encoder should be Software (x256), not Hardware as it is by default
- [x] MKV, so we can upload to Vimeo
- [x] MKV, for not finished videos is better MP4 has issue with not finished videos
- [x] Output Folder: G:\drive\Latest Sprint
|
|
Recording
Input Sources (step1)
- [x] Sources in OBS
- [x] OBS allows to choose one or more active input source
- [x] Source area: Example https://webcast.swisscom.ch/csr/#/webcast/5fc4d18e6bf742439e2d73df/en
- [ ] — Display Capture
- [ ] Choose one monitor, go on full screen,
- [ ] Work-around Choose one monitor, go on full screen, do the OBS recording from other monitor
- [ ] Choose Display
- [ ] Choose the monitor we are using
- [ ] Configured Displays / Monitors
- [ ] Upload to Pcloud if Google Drive if not synched (Pcloud gets synched directly)
- [ ] — Audio
- [ ] Audio Output (source1): Choose a device that is connected Audio Output Connected or choose default
- [ ] Windows Default Devices
- [ ] default: Windows default speaker (Playback device) —> when recording a video (like SNB video)
- [ ] default: Windows default recording device
- [ ] Audio Input (source 2): Usually the microphone we are using or default
- [ ] Image – add snbchf’s logo to the video while recording
- [ ] When recording make sure that only one display is active (see it in preview)
- [ ] — Window Capture
- [ ] Window Capture one Tab Only
- [ ] Choose the Window you want to show
- [ ] [to be filled]
- [ ] –> for each display you must change the video size
- [ ] Must change Output Sizes according Sources
|
|
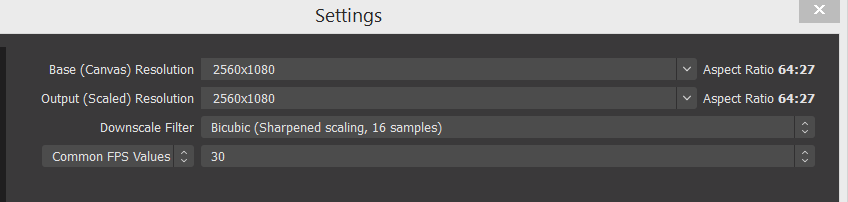
Video Sizes (step2)
- [x] Must change Output Sizes according Sources Switch sources on or off
- [x] Switch sources on or off and choose output
- [x] — Sources
- [x] Full Screen Recording Screen:
we currently use the the 2560 size
This gives a sufficent quality.
- [x] Set base Canvas same as input screen
- [x] Set base canvas to 1920, same as Input Display (for example Acer screen)
- [x] Store this as profile
|
|
Record Area (step3)
- [ ] — Display Capture
- [ ] make sure that you see the full screen inside OBS preview
- [ ] — Window Capture
- [ ] Adjust Red Box , so that you can see only the video
- [ ] must adjust output size again —> very complicated
|
|
Scene
- [x] Each scene should contain everything needed for recording a video or doing a stream
- [x] you have only 1 scene active during recording/streaming
- [x] if you have 2 scenes for example, during recording you change the scene, the whole screen will change based on what is included in the scene
- [x] Display Capture, Audio input/output are the basic ones, you can add an image, camera, random text etc.
- [x] to add source to a scene, click on the plus (+) button in “Source” box on bottom left side
- [x] —- Questions
- [x] why should I use scenes? – there is no reason to use 2 scenes, because only one scene can be active
- [x] is it for mixing videos from 2 sources? – This is not possible to mix videos from 2 sources, because the sources are working with priorities
- [x] example: you have 2 sources for display capture for each monitor, OBS will work only with the one which is on the top of the sources
- [x] So, first source has the biggest prio and will be shown anyway in the scene
|
|
Profiles (regular)
- [x] I can define profiles for each output/base screen size
- [x] One for 3200, one for 1920
- [x] Profiles for different sizes
- [x] — Export profile
- [x] Click Profile –> Export –> Choose where to save (G:\drive\prgs\Program Settings\Profile)
- [x] Export useful if settings are more complicated
|
|
Camera
|
|
OBS Problems
https://appuals.com/fix-failed-to-start-streaming-in-obs/
- Missing / Corrupted C++ Redist – As it turns out, one of the most common instances that will cause this issue is a scenario in which you’re either missing the Microsoft C++ Redistributable 2017 package or the one that’s currently installed is corrupted. To fix this particular issue, you need to ensure that you install the latest version of the Microsoft C++ Redistributable 2017 package correctly.
- Outdated the graphics driver – Another potential situation that might cause this problem is a severely outdated GPU driver that makes it hard for the OBS software to maintain the streaming connection with YouTube. In this case, all you need to do is update to the latest graphic drivers available.
- Conflict with the In-Game Overlay – If you’re using some kind of DVR software that includes an overlay function, chances are it will conflict with the NVENC encoder feature used by OBS. In this case, you can resolve the conflict by disabling the in-game overlay feature or by uninstalling the conflicting software.
|
|